Replaces
This part doesn’t fit a . Select from parts that fit.
Frequently bought together
Item Condition:
New
Attention California Customers:
 WARNING: This product can expose you to chemicals including Lead and Lead Compounds, which are known to the State of California to cause cancer, and birth defects or other reproductive harm. For more information, go to www.P65Warnings.ca.gov.
Lifetime Warranty
This item is backed by our limited lifetime warranty. In the event that this item should fail due to manufacturing defects during intended use, we will replace the part free of charge. This warranty covers the cost of the part only.


Created on:
Tools used
Tools used
Hi, I'm Mike from 1AAuto. We've been selling auto parts for over 30 years! We're dedicated to delivering quality auto parts, expert customer service, and fast and free shipping, all backed by our 100% satisfaction guarantee. So visit us at 1AAuto.com, your trusted source for quality auto parts.
We're bringing our vehicle up on the lift to make it easier to show you what's going on, but you should be able to do this either with the vehicle on the ground or the front end raised slightly. Once the vehicle is supported, you'll want to take off your left front wheel, and you'll want to do that with a 22mm socket. You'll pull the lug nuts off, pull the wheel off, and then you'll have access to the inner fender liner.
You can access the three Torx bolts that are right on the inner fender liner. They're T20 bolts, and you'll want to remove those along with the two clips on the top of the fender liner so that you can push the liner out of the way. With the tool that you can get from 1A Auto, you can pop it right in the clip and pull the clip right out of the fender liners. Once you have the centers out, the bottom half will come out very easily just like that. There's one more clip right here in the back on the inner wheel well. You'll pop out the center and then the bottom half. With the clips out and the bolts out, you can pull the fender liner out in front of the brake rotor and get it out of the way.
Most washer bottles are going to have fluid in them when you are removing them, so you're going to want to empty that. To do that, you have a rubber hose right here that you can disconnect from the pump itself, which usually just pops right off. At that point, you just need to catch all the fluid with a bucket. From here, you can pop the connector off. Then it's simply as easy as pulling it out of the housing and lifting straight up. You're going to lose a little bit more washer fluid most likely so be prepared for that. At that point, you have it out of your vehicle.
The new pump goes in very much like the old one. You just slip it in the rubber boot, and then you can lock it into place like that. The connector can go on like that, and the last part is hooking up the rubber hose, which slides right onto the pump like so. The fender liner can now be put back into place. Tuck it behind the ABS sensor wire, and then start putting your push pins right back into place. You'll want to reinstall your three T20 Torx screws next in the front of the fender liner.
Now, you'll want to reinstall your wheel and tire. With the tire back on the ground and lug nuts just hand tightened into place, you'll want to torque each one in a cross pattern to 140 foot-pounds.
Thanks for watching. Visit us at 1AAuto.com for quality auto parts, fast and free shipping, and the best customer service in the industry.
Tools used
Hi, I'm Mike from 1AAuto. We've been selling auto parts for over 30 years! We're dedicated to delivering quality auto parts, expert customer service, and fast and free shipping, all backed by our 100% satisfaction guarantee. We've created thousands of videos to help you install our parts with confidence. That saves you time and money, so visit us at 1AAuto.com, your trusted source for quality auto parts.
In order to get your old light down if it's in one place or to get your new light up, you need to remove this bracket, which is one 10 millimeter bolt here and two 15 millimeter bolts here. I'm just going to use some rust penetrant and spray the back side before I remove them. I loosened the small one, and I removed the two big ones. I'll just let it kind of hang out of the way. And by looking at our new fog light, you can see to remove it, there's four mounting holes. There's four mounting locations. There's seven millimeter bolts that hold it to the top. At the base four corners. So, those bolts underneath. And underneath, you can see two are very easy to see. There and there. And two are more difficult to point out, but there on the sides. You'll want a seven millimeter socket with an extension and a ratchet and remove those bolts. Remove this bracket detached, gently pull it down. Pull your light out.
I have a bucket underneath to catch any fluid that comes out. We're going to pry up. You actually want to pull out the top of the pump first and then pry up. You're going to get all kinds of fluid coming out. Try and control it until it drains out, and just let that drain for right now. With most of the fluid now drained out, you want to disconnect your fluid lead, which you just twist, get loosened up from the washer pump, and pull it off. And then disconnect your electrical lead. Disconnect this little tab, pull up, and take the pump is off.
Replacement pump back in, hook up the connector first. Bring it up close. Hook up your washer line feed and then push it up into place. There's another harness that you kind of have to move out of the way. Push it up into place. Put the pickup down in, push it in, and then push it back against the bottle to lock it in place.
Gently kind of pull down on this. Feed your new light up into place. It'll start in the seven millimeter bolts to hold it. Put the driving light bulb in. In, lock it in and then reconnect our fog light. Now we'll put this bracket back in place. Tighten these up first. And then adjust it back to where it was and tighten up the 10 millimeter bolt. Now refill your washer fluid right here next to your battery in this vehicle. And recap it.
Thanks for watching. Visit us at 1AAuto.com for quality auto parts, fast and free shipping, and the best customer service in the industry.
Tools used
Brought to you by 1AAuto.com, your source for quality replacement parts and the best service on the Internet.
Hi, I'm Don from 1A Auto. I hope this how-to video helps you out, and the next time you need a part for your vehicle, think of 1AAuto.com. Thanks.
In this video, we're going to show you how to replace the front washer pump on this 2002 Chevy Suburban, and it's the same part and similar process on these Suburban's from 2000 to 2004. The items you'll need is a new front washer pump from 1AAuto.com, 10mm and 13 marginal socket and ratchet with an extension, 8mm wrench, flat blade screwdriver, and a pair of pliers.
Start off by removing this 10mm bolt, then loosen this 10mm bolt right here. Then just move this brace out of the way. Now, using your 8mm wrench, you just want to loosen up both of these connections. You start with the negative, loosen it, and then pull that off and then remove the positive cable. Now, you want to remove this 13mm bolt and pull this battery hold down up and out. We'll just fast forward as Don removes that bolt. The hold down will just pull right up and out. Now, lift your battery out. Now, remove these seven 10mm bolts in the battery tray. We'll fast forward as Don does this. Now, lift the battery tray up and out.
Next, remove these four clips from inside your inner fender. For the smaller clips, you want to just pry out the center and the bottom will pull out. You can either use a flat blade screwdriver to pry out the center and then use pliers to pull it out the rest of the way, or you can use wire cutters and just feed them underneath it and just pull them out with those just make sure not to cut the clips. For the larger ones, you just pry them out. We'll just fast forward as Don removes those other three clips. Now, lift up on this tab and pull the inner fender free. Then just tuck the inner fender back behind the wheel.
Pull the hoses free from the side of the washer bottle, and then just remove this 10mm bolt. We'll fast forward as Don does that. Then remove this 10mm bolt down behind the inner fender. Now, if there's washer fluid inside your washer bottle, you want to just make sure you have a drip pan underneath it and then pull the washer pumps up and out. Then disconnect your washer level sensor. To do this, you just pull up on the tab and disconnect the harness and then push the washer bottle down and out.
Pull the hoses free from the side of the washer bottle, and then just remove this 10mm bolt. We'll fast forward as Don does that. Remove this 10mm bolt down behind the inner fender. Now, if there's washer fluid inside your washer bottle, you want to just make sure you have a drip pan underneath it. Then pull the washer pumps up and out. Disconnect your washer level sensor, and to do this you just pull up on the tab and disconnect the harness. Then push your washer bottle down and out.
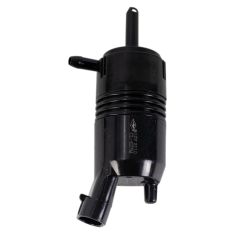
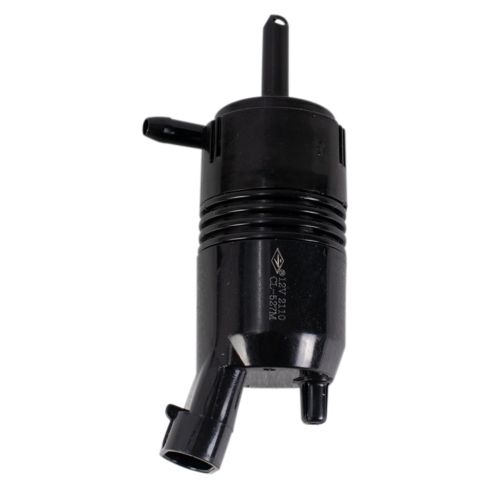
Now, your front washer pump is the one with the blue harness. Lift up and disconnect the harness, and then just pry this hose off. On the left is the old washer pump; on the right is the new one from 1A Auto. You can see they're very similar, and they'll fit and work exactly the same. Take your new washer pump and push the hose into place. Then, reconnect the harness. Feed your new washer bottle back up into place. Feed your new washer bottle back into place and then take your washer pumps and push them straight back down into the washer bottle and then back until they snap in.
Now, reconnect your level sensor harness. Pull the washer bottle up into place and re-clip the hoses on the side. Then replace that 10mm bolt just tighten it up. Then replace and tighten up this lower 10mm bolt. Now, pull the inner fender back from behind the wheel and into place. We'll fast forward as Don replaces those four clips. The larger ones just push right in and the smaller ones you just push them in and then push the center in to lock them. Replace your battery tray and then replace those seven 10mm bolts. Lower your battery back into place and then put your battery hold down back into place. Just tighten that back up.
Now, reconnect your positive battery cable and tighten it up. Now, reconnect your negative battery cable and tighten that up. Put that brace back in place and then replace that 10mm bolt and tighten it up. We'll just fast forward as Don tightens up this 10mm bolt and the 10mm bolt at the other end of the brace. Now, replace your washer fluid, put your cap back on, and you're all set.
We hope this video helps you out. Brought to you by www.1AAuto.com, your source for quality replacement parts and the best service on the Internet. Please feel free to call us toll-free, 888-844-3393. We're the company that's here for you on the Internet and in person.
Tools used
Tools used
Brought to you by 1AAuto.com, your source for quality replacement parts and the best service on the Internet.
In this video, we're going to replace the front windshield washer pump on this Chevy Venture. This pump fits a lot of different GM cars and it fits nice, on the '04 Venture and all kinds of different cars. You shouldn't need any tools. You can replace it by hand.
Your washer is right over here on the passenger side of your motor, right where I'm putting my hand down in there. There are two pumps. The front one is your front washer pump. Here's a close-up of it. The red arrow obviously points to the pump. The yellow arrow is pointing to the small hose you have to disconnect. This electrical connection, just lift up on the tab. Pull it up and off, and then there's a hose. You just need to twist the hose some and pull it off. Then, you pull the washer pump out, and now you pull it up.
To put it back in, do the same thing, put it down in. Lock it back into place. Reconnect your hose and reconnect your electrical connection. I didn't replace it because this pump is actually in fine shape and working properly, but that's how you replace it.
We hope this video helps you out. Brought to you by www.1AAuto.com, your source for quality replacement parts and the best service on the Internet. Please feel free to call us toll-free, 888-844-3393. We're the company that's here for you on the Internet and in person.
Tools used
Brought to you by 1AAuto.com, your source for quality replacement parts and the best service on the Internet.
Hi, I'm Mike from 1A Auto. I hope this how-to video helps you out, and next time you need parts for your vehicle, think of 1AAuto.com. Thanks.
In this video, we are going to show you how to replace a washer pump on this 2003 Chevy Monte Carlo and it's the same part and similar process on this Monte Carlos from 2000 to 2005 and the items you'll need are a new washer pump from 1AAuto.com, 7 millimeter socket and ratchet, flat blade screwdriver, drip pan and jack and jack stands.
Start of by removing these two 7 millimeter bolts. Now, remove these three 7 millimeter bolts right here. Now, pull this panel to the side and down and your washer bottle and washer pump are right here. Reach up and disconnect the harness for both the level sensor and the washer pump and then just pull the washer hose free and let it drain out into a drip pan. When you let it drain out, then you need to pull your pump out and it pulls out at the top and then up and out of the washer bottle and more fluid will drain out. Make sure you take out the old grommet that's in the washer bottle and insert your new grommet into the washer bottle and then reverse the process.
You can reconnect your pump first and then put it down into the washer bottle grommet first and then clip it in at the top, and then reconnect your other connections. We'll just fast forward as Mike replaces those five 7 millimeter bolts. Once those are replaced and tightened up you are all set.
We hope this video helps you out. Brought to you by www.1AAuto.com, your source for quality replacement parts and the best service on the Internet. Please feel free to call us toll-free, 888-844-3393. We're the company that's here for you on the Internet and in person.
Tools used
Hi, I'm Mike from 1AAuto. We've been selling auto parts for over 30 years! We're dedicated to delivering quality auto parts, expert customer service, and fast and free shipping, all backed by our 100% satisfaction guarantee. So visit us at 1AAuto.com, your trusted source for quality auto parts.
In this video, we're going to be working with our 1996 GMC Sierra. We're going to show you how to remove and replace your vehicle's washer fluid pump.
If you like this video, please click subscribe. We have a ton more information on this and many other vehicles, and if you need these parts for your truck, you can follow the link down in the description over to 1AAuto.com.
Here are the items you'll need for this repair: 7mm to 15mm socket, ratchet, socket extension, flat blade screwdriver, drain bucket
Open your storage box and remove the lid. There are two tabs located at the front that you'll want to pry out with a flat blade screwdriver and lift up. Remove the 13 millimeter nut inside of the wheel well with a 13 millimeter socket and ratchet. Remove the 10 millimeter bolt at the top of the washer fluid reservoir with a 10 millimeter socket and ratchet.
Remove the 7 millimeter screw on the fill neck. Remove the fill neck from the reservoir. Remove the washer fluid reservoir. Make sure you have a drain bucket set up underneath there. You'll need to remove this cover.
The ends, unsnap with some tabs. Remove that. Disconnect the pump and the hose. Remove the pump from the reservoir. Remove the pump.
Reinstall the pump onto the washer line. Reinstall the pump into the washer. Snap the lines into place. Close the electrical connector. And our cover will hook back onto it's tabs.
Reinstall the washer reservoir. Reinstall the 10 millimeter hold down bolt, and tighten it down with a 10 millimeter socket and ratchet. Install the filler neck, as well as the 7 millimeter screw.
Reinstall the cargo box. Reinstall the 13 millimeter hold down nut. Reinstall the lid. Open the cap and refill your washer reservoir to capacity.
Thanks for watching. Visit us at 1AAuto.com for quality auto parts, fast and free shipping, and the best customer service in the industry.
Tools used
Tools used
Brought to you by 1AAuto.com, your source for quality replacement parts and the best service on the internet. Hi, I'm Mike Green, I'm one of the owners of 1A Auto. I want to help you save time and money repairing and maintaining your vehicle. I'm going to use my 20 plus years experience restoring and repairing cars and trucks like to show you the correct way to install parts from 1aauto.com. The right parts installed correctly that's going to save you time and money. Thank you and enjoy the video.
In this video, we're going to show you how to replace the windshield washer pump on this 1997 Pontiac Sunfire. No tools are necessary. The windshield washer motor replacement, it's going to be similar for GM vehicles, you can see up underneath this Sunfire. There's the engine, there's the front driver's side tire, and there's the washer reservoir and the motor. Most GM vehicles it's going to be kind of the same, you just need to find your washer reservoir and the motor's going to be pretty easy to reach and to get this out its pretty straightforward. You can see my windshield washer level is right here so I'm going to lose some when I do this; hopefully you don't have too much, if you have too much get a nice clean catch can so you can recycle or just buy some extra.
It's pretty easy, just disconnect the harness. This is your feed for your fluid so what you want to do is try and turn this boot and that will pull off pretty easy and you see there goes my washer fluid. It's starting. Then this pulls away and then up and out and obviously to replace, the same thing, push back in, put down, reconnect the harness and reconnect your hose. So this is a pretty easy thing to do, do it yourself, you don't even need any tools, just the only issue is different GM vehicles, it will be located in different places.
We hope this helps you out. Brought to you by 1AAuto.com, your source for quality replacement parts and the best service on the internet. Please feel free to call us toll free 888-844-3393. We're the company that's here for you on the internet and in person.
Tools used
Hi. I'm Mike from 1A Auto. We've been selling auto parts for over 30 years.
In this video we will be removing and installing a windshield washer fluid pump in a 2008 Cadillac CTS 4. If you need this part or other parts for your vehicle, click the link in the description and head over to 1AAuto.com.
Take these pins out. You're going to untwist them. Once they're untwisted you can pull them up. Just like that. Sometimes they don't untwist too well so you've got to pry up underneath it. You can use your fingernail or like a straight head screw driver. You're going to pull this panel up, put it aside, and then I can pull this weather strip towards the center of the vehicle to take it off. You'll do the same with this side. Pull up here and pull up there. There's a fastener right there. A clip on the back side. You can take the weather strip towards the center and this piece will come right off.
You're going to pull these little clips out with a trim tool. We sell these at 1AAuto.com. Get in underneath there. There should be another one there, but it's missing on this vehicle. Out here. Right there. I'm going to use a 10 millimeter socket and ratchet. Take these two 10 millimeter bolts out. Alright, good.
We're going to pull this push clip off. We're going to use a clip trim tool and then there's one right here we need to pull off. Pull that off. This is just a rubber shield that's attached to the bumper. We're going to leave it attached to the car on this side. Then over here we'll do the same on the other side. This one's actually ripped right here so we don't have to do that. Then, this piece over here is already out, so we're all set on this side. We're going to take these plastic push clips out. Use our trim tool again. Pull that out and we'll pull this one out. These other ones we can leave in. Those just hold this front skirt on. Pull that out. Pull this one out too.
So we're going to disconnect the fog light. There's a little clip on the back side and then a clip on the front side. If you do them somewhat together, you can pull it down. Pull the back side clip off first and then you can pull on the front side. See? Two clips. You just pull them out. I'm going to do the same for this side. Disconnect the fog light. There's this air ducting here. We're going to pull that off. Looks like it's missing from the other side. This is there to force cool air onto the breaks while you're driving.
This vehicle has headlight washers to it sprays washer fluid on the headlights. So we're going to disconnect that. We're going to use some needle nose pliers. We're going to pry this clip off. Just move it to the side a little bit. There. We're going to take a little right angle pick and get in there without stabbing yourself. Go all the way around to loosen up the hose. Like that. You can twist it off. Just going to work the hose back and forth. Then eventually come out.
All right when I pull this off, fluids going to come out so I just have this random bolt that's about the same size so I'm going to plug the hole with that. Just like that and that'll keep the fluid in there. Most of the fluid in there. Use my clip tool. Whoops. Pull these push clips off. All right. Use our trim tool. Pull this one out. I'll have a little more play with this. The 10 millimeter bolt right there we're going to take out. The process would be the same for the other side, then you can pull this off.
Pull this out over here. Grab and pull it straight forward. What I'm going to do is disconnect the electrical connector for the headlight pump. There. Then to disconnect this hose push down and you pull it out just like so. To pull the pump out you're going to pull it towards the outside of the car and then pull up. You can wiggle it back and forth a little bit and it will pull right out.
So we'll reinstall the headlight washer pump. Just line it up like that and just push it down. You can connect the connector. Just push it. Make sure it locks in place. Connect the electrical connector. Push it down to lock. We're going to reinstall the bumper. Make sure that lines up over there. Line this up over here. Line that side up like that, and you take these two 10 millimeter bolts. Put these in. You can snug these down. We're going to install this 10 millimeter bolt on the passenger side. When we're doing this, you want to make sure the body lines up with the bumper, and then snug that down. Procedure will be the same for the drivers side.
Connect the fog light connector. Line it up and then push so it locks in place. Same on the passenger side. Next we're going to reconnect our head light washer hoses. Most of our fluid leaked out but if you did this in a timely manner, you would have fluid coming out of there. Then we're going to move this clamp with some needle nose pliers back to its original location, right there. And it goes just like that. We're going to reinstall this shield. Push that push pin through up top and we'll push this one in down here, just like so. Same for the driver's side.
Next we're going to install this break cooling snorkel on the passenger's side. Our driver's side is missing. Put a push pin right, there and right there. Put a push pin there, one right here, and then one right here. All right--you're going to reinstall this liner. You're going to go up under here, and then to put the snorkel on it's just going to clip through like that. I'm going to put our push clips through there. Install these push clips right here and right here, and one right there. We're going to put our push clips in up top here.
Now we're going to reinstall this shield. I'm going to push this weather stripping on. It will go like that and same with the other side. Just like that. Now we're going to use these clips. Reinstall these retainers. And we'll reinstall this cover right here. Get that lined up. There's a little tab right there that it lines up with. Lock that down. And reinstall this over here. Make sure you go under the weather strip over here and press down.
Thanks for watching visit us at 1AAuto.com for quality auto parts, fast and free shipping, and the best customer service in the industry.